HDR Retrofit
You will be up and burning your eyes in no time
Special K HDR Retrofit
Special K's HDR Retrofit feature works on Windows 10/11 and can retrofit HDR support in most DirectX 11-12 games by forcing an scRGB 16-bit swapchain buffer (with SK's scRGB HDR option) or a 10-bit swap chain buffer (with sk's HDR10 option) and undoing the SDR compression of the internal tone mapper of the game with its own user-configurable tone mapper.
-
For native DirectX 11 games, Special K even supports remastering 8-bit, 10-bit, and 11-bit render passes as well as compute passes to further enhance the end result of the HDR retrofit process, plus an Adaptive Tone Mapping option is available.
-
HDR retrofit support in DirectX 12 and OpenGL is more limited. In DirectX 12 and OpenGL, Special K can undo the SDR compression of the internal tone mapper of the game with its own user-configurable tone mapper; however, remastering options often don't work in OpenGL and are not supported in Directx 12. Further, Adaptive Tone Mapping is not available in Directx 12.
- In the case of OpenGL, Special K also promotes the game to OpenGL-IK (uses an interop system where DirectX 11 is used for final presentation), which brings enhancements such as flip model presentation and HDR Retrofit.
-
Various HDR presets are available along with an HDR Visualization feature that can display the brightness output of the game in various ways.
Check out the HDR Remaster Database as well!
The 6 steps to Special K HDR Retrofitting:
A. Your display must support HDR.
B. HDR must be ON in Windows Desktop.
C. HDR Retrofit only works in D3D11, D3D12, and OpenGL (and possibly D3D9 games...)
Step 1. Launch a D3D11, D3D12, or OpenGL game (or possibly a D3D9 game...)
Step 2. Configure the game to run borderless fullscreen for max. compatibility.
Step 3. Display Special K's control panel menu (Ctrl + ⇧ Shift + ← Backspace)
Step 4. Open the HDR menu at the top of Special K's control panel menu and press the HDR Setup button.
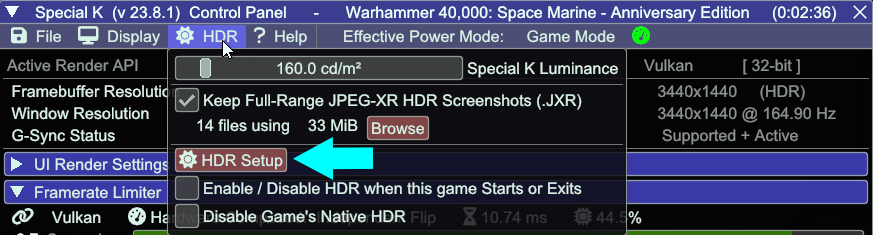
Step 5. Select the scRGB HDR (16-bit) option from the HDR Calibration widget that appears on the top-right side of the screen.
-
HDR10mode is experimental and works better for games that useDLSS3 Frame Generation. You may also use this mode to remaster the pipeline for Native HDR10 games (DX11 only). -

Step 6. Restart the game.}
Step 7. Check out the HDR Remaster Database for what type of pipeline remastering can be enabled for the game.
HDR Calibration Guide
Most options in Special K have tooltips that appear upon hovering your mouse cursor over them.
-
Open the
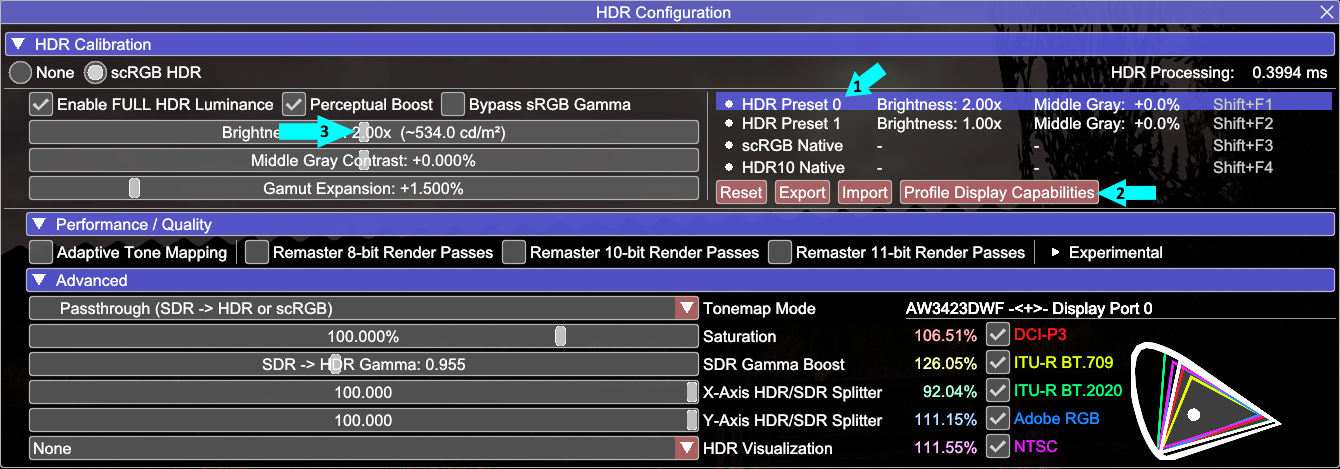
HDRMenu and press theHDR Setupbutton to open the HDR Calibration widget, and then, on the Right side, selectHDR Preset 0 -
Click
Profile Display Capabilitiesand use the provided image inside to set the Clipping Point where you can see a pure white screen and pressOK -
On the Left side, use the
Brightness Scaleslider to adjust to yourcd/m2value according to your display's capabilities.-
To prevent brightness from frequently being reduced when using a display with an Automatic Brightness Limiter (ABL), we suggest you set
Brightness Scaleto a fraction of the max brightness value as calibrated in Profile Display Capabilities:- LCD and QD-OLED displays:
2/3 of max - WOLED display:
1/2 of max
- LCD and QD-OLED displays:
-
-
For pipeline remastering, check if the HDR Remaster Database lists any known (in)compatible types.
Once you are satisfied with your settings, you can press
Exportto save your current HDR config. When Enabling Special K's HDR in a different game, you can simply select Preset 0 or 1 and pressImportto load your saved values.
Terms and Settings Explained
| Control | Description |
|---|---|
| Middle-Gray Contrast | Adds or subtracts contrast from typical flesh-tone content
|
| Content EOTF | This setting is used to match the processing Special K's HDR tonemapping uses with the gamma/EOTF that the game is mastered for. Most games will use 2.2 or sRGB. Some games (including many Unity titles) require the usage of Linear and will be extremely dark and have incorrect colors if anything else is used, so it is usually obvious when this setting is needed. It is crucial to match the content EOTF correctly for the best experience!
|
| Reset | Resets the currently selected HDR Preset to the software default
|
| Export | Exports the current profile's settings to \Special K\Global\hdr.ini
|
| Import | Imports settings from \Special K\Global\hdr.ini to the current profile |
Make use of Export and Import to save and load custom HDR configurations
Tonemap Modes
These control luminance response when processing HDR
sRGB Inverse
Converts SDR to HDR
- The main tonemap mode, this is where the magic happens.
- Use this if your goal is converting a game from SDR to HDR
Also used for scRGB Bypass
HDR10 Passthrough
Use only in games that are native HDR.
- Intended to analyze HDR quality in games, but has some potential for image adjustment.
- Required if you want to use SpecialK's screenshot features along side a game's Native HDR
Raw Framebuffer
A raw HDR swapchain with no post processing. Made to be used with Reshade.
Do not use this by itself!
If you don't want to use SpecialK's tonemapper, but something like Pumbo's Advanced AutoHDR or Lilium's Invesrse Tonemapper, you'd use SpecialK in Raw Framebuffer mode along side a Reshade shader of choice.
Pipeline Remastering
Pipeline remastering is available for D3D11 & OpenGL and is a feature of Special K's HDR retrofit that increases the range and precision of intermediate render passes to infuse/preserve HDR qualities early in the render pipeline rather than try to produce an HDR image using a game's final output alone (i.e. Xbox Auto-HDR).
Remastered passes include things like atmospheric scattering, HDR (pre-tonemap) light accumulation, and (unfortunately) shadow maps and FMVs. Not all passes work as intended when their range and precision are increased, and the performance cost of upgrading these render passes varies from game to game.

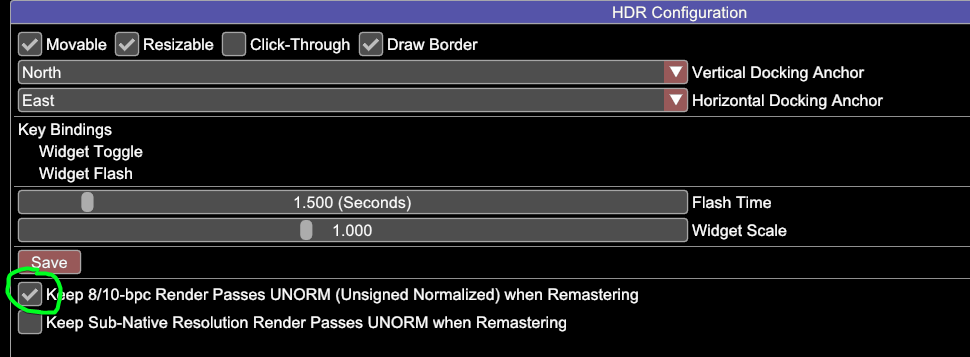
An additional option available in Special K is Keep 8/10-bpc Render Passes UNORM, which keeps 8 & 10 bit render remaster targets in the UNORM format, rather than the default float format. The UNORM format is capable of providing reductions in color banding, but cannot extract overbright bits from the game engine. Overbright bits are responsible for many of the image quality benefits of remastering (such as brighter highlights and more highlight detail), so float is always preferred if they cause no issues.
You can find the option to Keep 8/10-bpc Render Passes UNORM by right clicking the HDR widget, checking the box, pressing save and restarting your game. It is not always required to restart the game, but it is recommended.
Special K has disabled all of the render pass remastering options by default, since they were the source of many compatibility issues.
However, remastering is important for image quality and, in some games, even required for the UI.
You are encouraged to enable these yourself, they just cannot be the default policy or support requests from first-time users would never end

Consult the HDR Remaster Database for community collected information of known game and remaster option combinations.
Cost Analysis of Remastering
Special K displays statistics in the Remastering Tooltips upon hovering over each Remaster element:
- VRAM Allocation Statistics for Remastered Render Passes
- Ratio of Passes Eligible for Remastering vs. Actually Remastered
With these two additions, you know:
- How many(if any) render passes each option is responsible for
- How much additional VRAM is being used by remastering.
Remastering does have a performance impact, but it is difficult to measure.
The underlying SDR -> HDR process without remastering has virtually no performance overhead.
HDR Visualizations
Luminance
vs. EDID-Max-Avg-Y(Maximum Full Field Luminance)
This visualizes image brightness versus the maximum luminance your display can process across the entire screen.
It is acceptable to exceed the range of this visualization, but ideally you would limit the pixels too bright for Max-Avg-Y to less than half the screen.
vs. EDID-Max-Local-Y(Maximum 10% Window Luminance)
This visualizes image brightness versus the maximum luminance your display can process in a 10% local window. This is your display's ability to handle HDR highlights, and it can only guarantee this level of performance in small localized regions. Obeying this limit is important or atmospheric bloom will inevitably wash out image detail that existed in the original SDR image!
Any solid color produced by either of the EDID visualization modes is a luminance level your display is capable of displaying without using smoke and mirrors. What you need to watch out for are color cycling pixels, they are out-of-range for your display and you must dial-back luminance settings or you will lose image detail.
Color cycling pixels are too bright for your display; they will not be clipped (unless in HGIG mode), but will cause the image to be processed differently.
Tips and Tricks
- As long as SKIF is running, it enables a shortcut to toggle Windows HDR off/on. Ctrl + Shift + Win + H. This is more reliable than the Windows shortcut and takes into account which monitor the mouse is on for multi-monitor setups.
Global Default INI Settings
Default INI that will Enable HDR in all Games Automatically
(how good an idea this is, is up for debate)
To define default HDR values:
- Create
<path-to-SpecialK>\Global\default_SpecialK.ini - Place select INI tidbits from the game you just configured in
default_SpecialK.ini
[Render.DXGI]
UseFlipDiscard=true

[Render.OSD]
;HDRLuminance: 1.0 = 80 cd/m^2, 9.375 = 750 cd/m^2
HDRLuminance=9.375

[SpecialK.HDR]
scRGBLuminance_[0]=18.75
scRGBGamma_[0]=1.0
ToneMapper_[0]=1
Saturation_[0]=1.0
MiddleGray_[0]=1.25
Use16BitSwapChain=true
AllowFullLuminance=true
Preset=0
That works for any other aspect of Special K configuration as well, so if you wanted SK's framerate limiter everywhere, that is how you would do it.
If using a local DLL (e.g. dxgi.dll) to inject Special K, the default INI will be called default_dxgi.ini
Applying Default Values to a Game Already Played:
Option 1 - Directly from SKIF
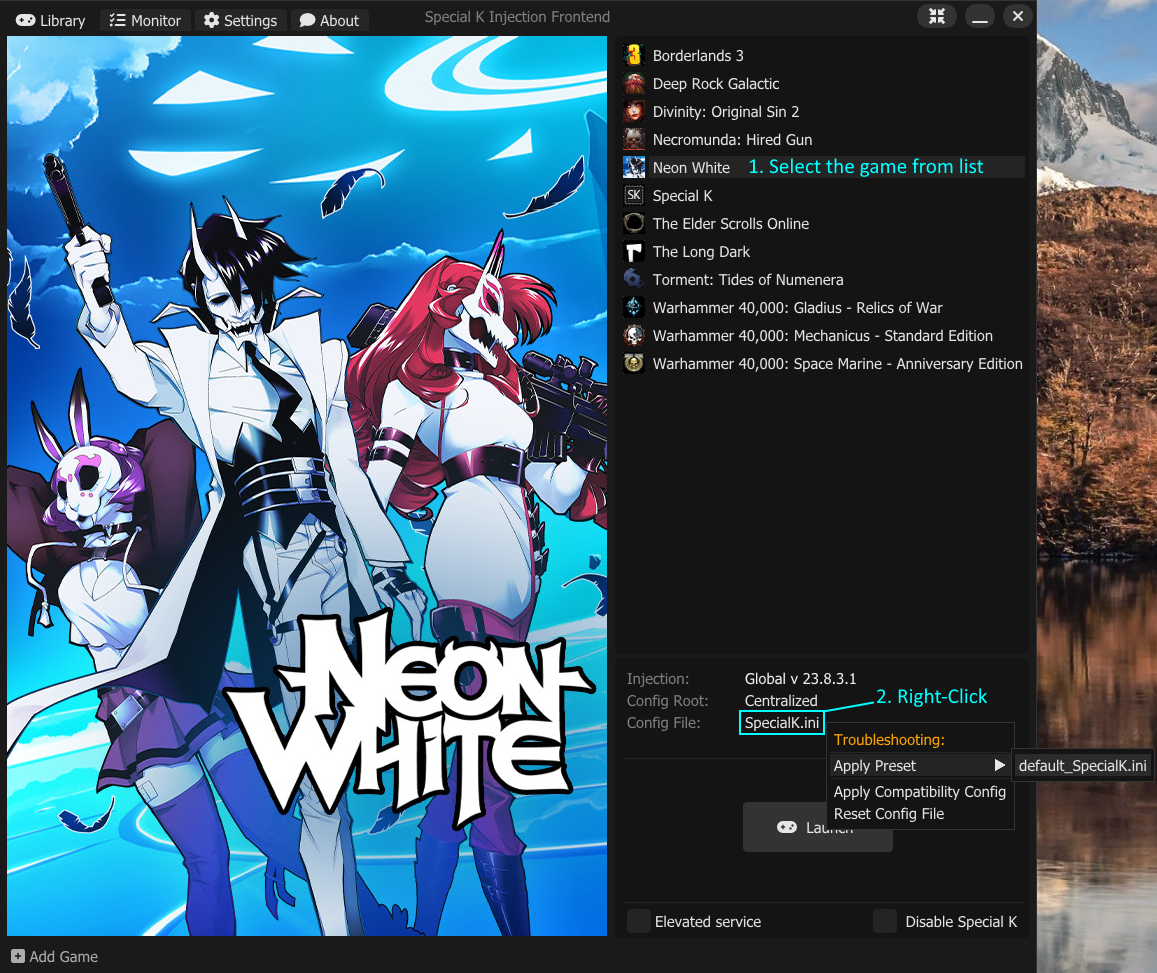
You may either Apply Preset or Reset, the latter will give you a completely clean config and then automatically apply preset upon launching game.
Option 2 - While launching a game
- Press and Hold: Ctrl + Shift while starting the game
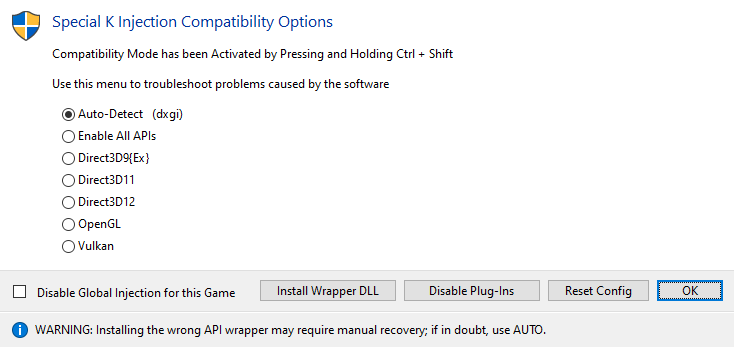
- Press Reset Config
HDR Retrofit for DirectX 9 games
Option 1 - dgVoodoo2
Option 2 - DXVK HDR Fork by Lilium + Special K Vulkan Bridge | (NVIDIA only)
Thanks to Lilium for the DXVK fork focused on HDR.
- Download Lilium's DXVK archive from the release page which contains the compiled DLL files. Both regular and gplasync releases work.
- Extract the correct
d3d9.dllfrom the archive depending on whether your game exe is 32 or 64bit (consult PCGamingWiki), and place the dll where the game's primary.exefile is located. - Extract the
dxvk_d3d9.conffile to the same place as the DLL and rename the file todxvk.conf - Upon launching the game with Special K, accept the prompt to Enable the Vulkan Bridge and restart game.
- If everything looks fine and there are no rendering issues, proceed with HDR Calibration as usual.
If there are rendering issues, you will have to consult DXVK HDR Mod Readme and edit the dxvk.conf for your game and tweak the render targets until it renders as it should
Disable native HDR in games lacking an in-game toggle
Starting from v21.03.20, Special K added support for hiding HDR support from games so they do not enable their own HDR. This is useful for games that have poor quality native HDR with no in-game option to turn it off, and can allow the full use of Special K's HDR retrofit in those titles which may result in a better HDR experience.
Disable from Special K Control Panel
- Launch a game with Special K
- Open the
HDR Menufrom the top of Special K's Control Panel - Tick
Disable Game's Native HDR
Disable from .ini file
- Install Special K for the game, either globally or locally.
- Launch and close the game once to allow the Special K config file to be created.
- Open the game-specific config.
- Find and change the parameter
HideHDRSupportto true. - Save and close the file.